


资讯详情
飞鱼星系列下接三层交换机SSID+VLAN隔离的基础配置方法
发布时间:2019-12-18
某公司网络结构为标准三层架构,内网有服务器群、有线办公以及无线覆盖,由于日常来访宾客较多,为了保障内网服务器的安全,想要实现无线分为不同的SSID,实现来访的宾客禁止访问公司内部服务器、办公等网络资源。该公司网络由:AR2500G(路由器、AC控制)+VS5728G-V2(三层交换机)+VS1824G(连接服务器)+VS1224G(有线办公)+VS1018GP(POE交换机)+WS75(双频吸顶AP)组成,具体网络拓扑以及IP地址规划如下:

图1 AR2+三层交换方案拓扑
1. 三层交换机配置(以VS5728G-V2为例)
首先介绍三层交换机的配置,是为了能够更好地理解整个拓扑的结构。这包含了网段的划分,端口的规划等。
1.1 端口规划
端口0/1:用于对接网关(AC控制器),ACESS VLAN10
端口0/2:用于对接服务器,ACESS VLAN20
端口0/3:用于对接有线办公网,ACESS VLAN30
端口0/4:用于对接POE交换机TRUNK ALLOW VLAN1、100、200,(100为无线办公网络VLAN,200为无线来宾网络VLAN)
1.2 配置内容
1.2.1 创建VLAN
FYX>
FYX>enable
FYX#configure terminal
FYX(config)#vlan 10
FYX(config-if-vlan)#vlan 20
FYX(config-if-vlan)#vlan 30
FYX(config-if-vlan)#vlan 100
FYX(config-if-vlan)#vlan 200
1.2.2 VLAN接口
FYX(config)#
FYX(config)#interface vlan-interface 1
FYX(config-if-vlanInterface-1)#ip address 10.0.0.1 255.255.255.0
Config ipaddress successfully!
FYX(config)#interface vlan-interface 30
Create vlan-interface successfully!
FYX(config-if-vlanInterface-30)#ip address 192.168.2.1 255.255.255.0
This ipaddress will be the primary ipaddress of this interface.
Config ipaddress successfully!
FYX(config-if-vlanInterface-30)#interface vlan-interface 100
Create vlan-interface successfully!
FYX(config-if-vlanInterface-100)#ip address192.168.100.1 255.255.255.0
This ipaddress will be the primary ipaddress of this interface.
Config ipaddress successfully!
FYX(config-if-vlanInterface-100)#interface vlan-interface 200
Create vlan-interface successfully!
FYX(config-if-vlanInterface-200)#ip address 192.168.200.1 255.255.255.0
This ipaddress will be the primary ipaddress of this interface.
Config ipaddress successfully!
FYX(config-if-vlanInterface-200)#interface vlan-interface 10
Create vlan-interface successfully!
FYX(config-if-vlanInterface-10)#ip address 172.16.0.254 255.255.255.0
This ipaddress will be the primary ipaddress of this interface.
Config ipaddress successfully!
FYX(config-if-vlanInterface-10)#interface vlan-interface 20
Create vlan-interface successfully!
FYX(config-if-vlanInterface-20)#ip address 192.168.1.1 255.255.255.0
This ipaddress will be the primary ipaddress of this interface.
Config ipaddress successfully!
FYX(config-if-vlanInterface-20)#exit
1.2.3 建立DHCP地址池并开启DHCP Server(服务器和有线办公手动配置IP)
建立DHCP地址池:
FYX(config)#ip pool vlan100
Create a new ip pool successfully.
FYX(config-ip-pool-vlan100)#gateway 192.168.100.1 255.255.255.0
Config the gateway ip successfully.
FYX(config-ip-pool-vlan100)#router 192.168.100.1
FYX(config-ip-pool-vlan100)#dns primary-ip 61.139.2.69
Configure the primary dns successfully.
FYX(config-ip-pool-vlan100)#dns second-ip 119.6.6.6
Configure the second dns successfully.
FYX(config-ip-pool-vlan100)#section 0 192.168.100.2 192.168.100.200
Create an ip section successfully.
FYX(config-ip-pool-vlan100)#lease 0:1:0
Lease time has been modified successfully
FYX(config-ip-pool-vlan100)#exit
FYX(config)#ip pool vlan200
Create a new ip pool successfully.
FYX(config-ip-pool-vlan200)#gateway 192.168.200.1 255.255.255.0
Config the gateway ip successfully.
FYX(config-ip-pool-vlan200)#router 192.168.200.1
FYX(config-ip-pool-vlan200)#dns primary-ip 61.139.2.69
Configure the primary dns successfully.
FYX(config-ip-pool-vlan200)#dns second-ip 119.6.6.6
Configure the second dns successfully.
FYX(config-ip-pool-vlan200)#section 0 192.168.200.2 192.168.200.200
Create an ip section successfully.
FYX(config-ip-pool-vlan200)#lease 0:1:0
Lease time has been modified successfully
FYX(config-ip-pool-vlan200)#exit
开启DHCPserver:
FYX(config)#dhcp-relay
Turn on DHCP relay successfully!
FYX(config)#dhcp-server 100 ip 192.168.100.1
Set the ipaddress of dhcp server group success !
FYX(config)#dhcp-server 200 ip 192.168.200.1
Set the ipaddress of dhcp server group success !
FYX(config)#interface vlan-interface 100
FYX(config-if-vlanInterface-100)#dhcp-server 100
Set vlan interface dhcp server group success
FYX(config-if-vlanInterface-100)#interface vlan-interface 200
FYX(config-if-vlanInterface-200)#dhcp-server 200
Set vlan interface dhcp server group success
FYX(config-if-vlanInterface-200)#exit
1.2.4 交换端口
FYX(config)#interface ethernet 0/0/1
FYX(config-if-ethernet-0/0/1)#switchport default vlan 10
FYX(config-if-ethernet-0/0/1)#interface ethernet 0/0/2
FYX(config-if-ethernet-0/0/2)#switchport default vlan 20
FYX(config-if-ethernet-0/0/2)#interface ethernet 0/0/3
FYX(config-if-ethernet-0/0/3)#switchport default vlan 30
FYX(config-if-ethernet-0/0/3)#exit
FYX(config)#interface ethernet 0/0/4
FYX(config-if-ethernet-0/0/4)#switchport mode trunk
FYX(config-if-ethernet-0/0/4)#switchport trunk allowed vlan 1,100,200
1.2.5 默认路由
FYX(config)#ip route 0.0.0.0 0.0.0.0 172.16.0.1
Config static route successfully!
1.2.6 来宾网访问控制
FYX(config)#access-list extended guest
Create ACL item successfully.
FYX(config-ext-nacl-guest)#0 deny 192.168.200.0 0.0.0.255 10.0.0.0 0.0.0.255
Config ACL subitem successfully.
FYX(config-ext-nacl-guest)#1 deny 192.168.200.0 0.0.0.255 192.168.100.0 0.0.0.255
Config ACL subitem successfully.
FYX(config-ext-nacl-guest)#2 deny 192.168.200.0 0.0.0.255 192.168.1.0 0.0.0.255
Config ACL subitem successfully.
FYX(config-ext-nacl-guest)#3 deny 192.168.200.0 0.0.0.255 192.168.2.0 0.0.0.255
Config ACL subitem successfully.
FYX(config-ext-nacl-guest)#4 permit any any
Config ACL subitem successfully.
FYX(config-ext-nacl-guest)#exit
FYX(config)#access-group ip-group guest subitem 0
Activate ACL successfully .
FYX(config)#access-group ip-group guest subitem 1
Activate ACL successfully .
FYX(config)#access-group ip-group guest subitem 2
Activate ACL successfully .
FYX(config)#access-group ip-group guest subitem 3
Activate ACL successfully .
FYX(config)#access-group ip-group guest subitem 4
Activate ACL successfully .
FYX(config)#exit
2. AP配置
2.1 准备阶段
为了方便配置,先按照下图拓扑连接,直接通过AC对AP进行配置。接下来,我们只举出一个AP配置的例子。
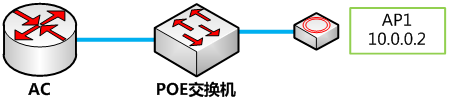
图2.1.1 AP配置拓扑
2.2 web配置
在AP上线之后,需要给AP静态指定IP、网关、掩码和AC地址等信息,具体配置如下图:
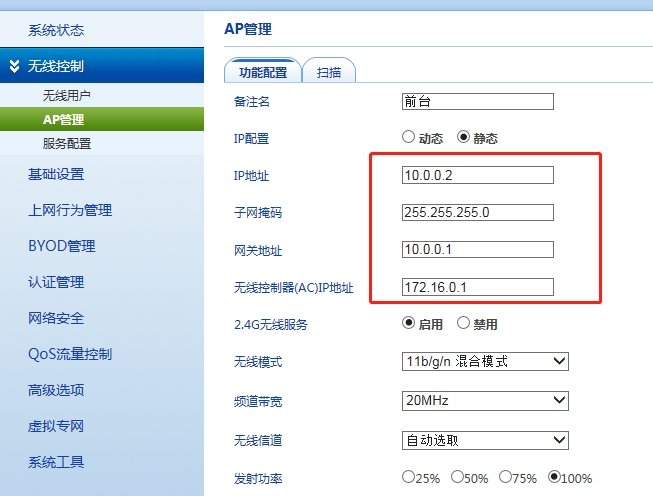
图2.2.1 AC上进行AP配置示例
配置完成保存后,AP会离线。至此,AP的配置已经完成。最后,需要进行进行AC的配置。
3. AC配置
AC的配置,分为外网配置、AP配置、服务配置、内网扩展配置、静态路由几个部分。AP配置已经给大家展示,外网配置和未接三层的配置情况一样,这里给大家介绍剩下的三个配置。
3.1 服务配置
从整网拓扑,可以看出,无线业务的VLAN100对应网段192.168.100.0,VLAN200对应192.168.200.0。经这样配置后,AC发往这两个网段的报文就会直接从本地二层发出。因此,我们在做服务配置时,给SSID的配置必须VLAN相同,同时建议网段相同:

图3.1.1 办公网SSID配置

图3.1.2 来宾网SSID配置
3.2 内网扩展配置
需要扩展的内网网段如下图(注意:SSID里面的VLAN网段在此处不需要增加,默认DHCP服务器扩展地址池里面会自动生成):
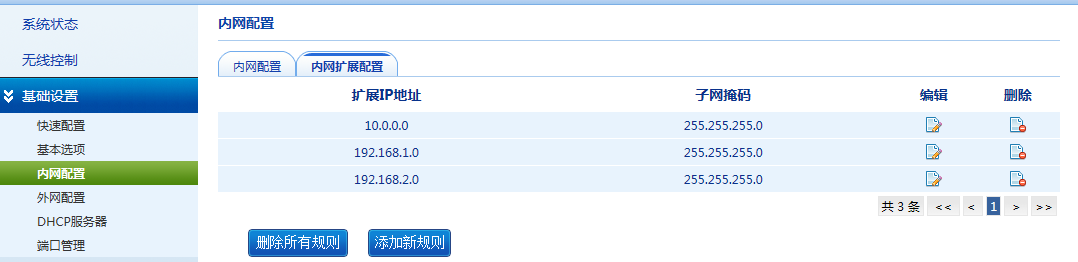
图3.2.1 内网扩展配置
3.3 静态路由
针对内网扩展的网段,将路由指向三层交换机对应的VLAN接口IP:172.16.0.254。
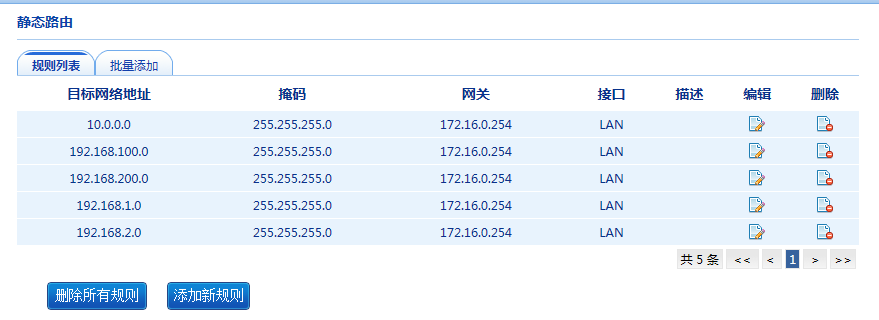
图3.3.1 静态路由
至此,所有配置完成。最后,只需要按照图1所示拓扑,完善整个网络的组建即可。
注意
(1) AP的管理VLAN并非必须是1,可以修改为其他VLAN,但是,对应的TRUNK口的PVID就要修改(例如:管理VLAN为1000,TRUNK口要加上命令switchport default vlan 1000)。
